Week 6 was all about reflecting on our limitations and problems from our second medium-fidelity prototype. After many discussions with our professors and among ourselves, we came to several conclusions.
We needed to make some of our components adjustable so that we can fine-tune our prototype without simply redrilling a new hole. We want the belt tensioner to be adjustable so we can easily make the belt taut or not. We also realize that there is a chance we need to dispense liquid faster or slower than we calculated, which means we need to use a different size gear. This means the rack and syringe underneath the rack must be adjustable to accommodate different sized gears. Also, we need one of the reels to be adjustable so that our client does not need to cut exactly 6 feet of film every time while still maintaining the film tension. These adjustable components could be implemented by cutting slots into the wooden board so the shaft can slide up and down on it.
In relation to adjustability, we realized that that several of our material choices were not feasible options for our future plans. For example, we were using glue to attach the gears to the wooden shafts, but this was so permanent and irreversible, that we need to avoid using it as much as possible in the future. We also found that the wooden dowel rods are not sturdy enough to use in our final. To these ends, we began to look for an alternative, industrial options. We came to the conclusion that shaft collars and metal shafts would fix these pending issues. They would be easy to remove if we needed to adjust one of the components.
Finally, we needed to implement a backboard to our design so that the axles are turning correctly. By adding a backboard, the shafts will have two points of support instead of one, which greatly increases the durability of the rotating gear and pulley system.
We had our modifications, and now we needed to begin implementing these changes. To begin this process, we began drawing out our design on a wooden board to plan out where the adjustable components would go. We then added measurements to each component with respect to one of the sides of the board. By adding the measurements, we could transfer the drawing into Adobe Illustrator so that we could laser cut our two boards to the exact same dimensions and specifications. Although this was very time-consuming in the front end, it made cutting a new board very easy and precise. We also needed a method to place our boards on a stand, so we used the X-carve to cut a groove into the wood (First time using it. It was pretty cool but took a long time). We then lodged the wooden boards in place so the lined up perfectly.
We then spent the next day or so assembling all of the components together with our newly bought metal shafts and shaft collars. The belt system (which was a huge problem previously) worked very smoothly. We did, however, face some issues with slippage between the shaft collars and gears, so we, unfortunately, decided to glue some of the collars to the gears to prevents this. This was still an improvement from last time because we could remove the collar and gear off of the shaft if we needed to. We then added the reels, the roller, and the fan. The whole prototype was assembled! Now, all we needed to do was test it. 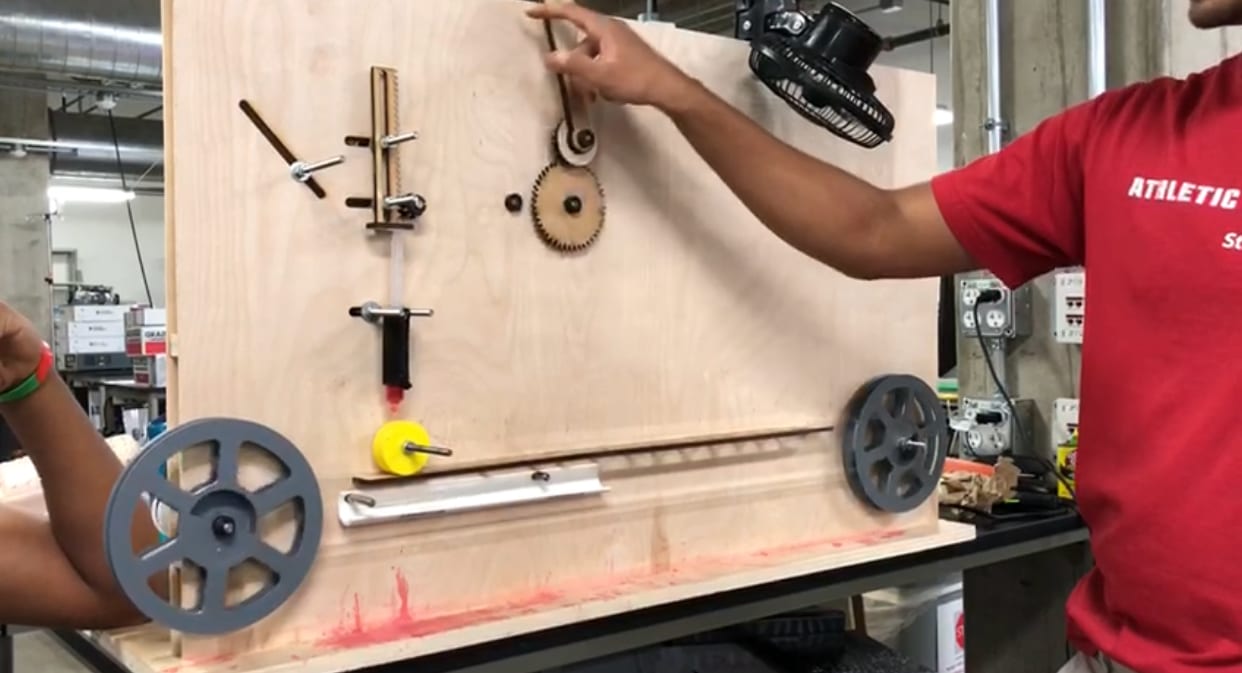
We spent all of today testing our prototype and making minor modifications to the design to improve the consistency and functionality of the machine. For example, we saw that the film was getting coated on both sides instead of just one because the liquid began to rest on the platform. Therefore, we changed the platform to have more holes in it so the liquid would fall down into the emulsion catcher (a PVC tube). We also had to make minor adjustments to the rack and the belts to make it function correctly. This was very easy due to our handy adjustable slot mechanisms!
Some problems we found was that the film would slip on the reels, which meant that the film wouldn’t move as much as we planned. This prevents the machine from coating all 6 feet of film, so we need to come up with a way to solve this issue. The roller also began slipping, which hurt the coating consistency, but this will be an easy fix by securing it better onto the shaft.
By the end of the day, we tested four strips of film, and none of them came out perfectly, but the last one was very promising. It is drying right now, so we don’t have a great photo of it yet, but the coating is consistent and thin. This was honestly the best news to get at the end of a long day because it gave me confidence that we are on the right path to success, especially since it is also my birthday today!